This picks up where the PVE installation left off: creating an iStoreOS virtual machine, importing the system disk, and connecting it to your existing LAN. Installing PVE itself, NIC passthrough, and single-cable VLAN trunking are outside the scope of this article.
Start by running the system with a single LAN NIC, but leave it disconnected on first boot so the new system's address services don't interfere with your existing network. If you're setting up a bypass router, you don't need to add a WAN NIC. If you're taking over the whole home network, wait until the management interface and networking are confirmed working before adding a dedicated WAN NIC.
The screenshots in this article are mainly from PVE 7.2 and iStoreOS 21.02. Option locations may differ in newer versions; use the screenshots to find the entry points, but rely on the text for configuration values. The network and disk diagrams are configuration illustrations, not software screenshots.
Before you start, keep a way back
You'll need an x86-64 PVE host that already has working access to its management interface, a free VM ID, and storage that can hold virtual machine disks. This article uses 104 as the VM ID and local-lvm as an example; your own numbering and storage names may differ.
On your first install, don't touch your existing main router, and don't modify the PVE management bridge directly. Have a local monitor, keyboard, or other usable console ready so you don't lock yourself out of the host after changing network settings. If you're replacing an existing router VM, back it up along with your current network configuration first.
The bypass router example below uses a single IPv4 LAN:
| Device | Example address | Notes |
|---|---|---|
| Existing main router | 192.168.2.1/24 | Continues handling internet access and DHCP for now |
| New iStoreOS | 192.168.2.2/24 | Confirm the address is free and exclude it from the DHCP pool |
| PVE management address | 192.168.2.88/24 | Keep the original address and gateway initially |
| Test computer | 192.168.2.120/24 | Use only this one machine to test the bypass router at first |
These numbers are just examples. If your LAN is 192.168.1.0/24, replan around your own subnet. Don't plug the example addresses straight into a live network.
Download the firmware and pick the right boot mode
There are two common entry points for iStoreOS x86-64 images:
- UEFI firmware directory: filenames contain
combined-efi.img.gz. - Legacy BIOS firmware directory: the corresponding images without EFI.
At the time of writing, the latest entry in the UEFI directory was istoreos-25.12.5-2026092410-x86-64-squashfs-combined-efi.img.gz. This article uses it to demonstrate the filename; when you download a different version later, just substitute the actual filename. Don't copy an outdated image's filename.
The image and the VM firmware must match: choose OVMF (UEFI) for UEFI images and SeaBIOS for legacy BIOS images. You can upload the archive to PVE as-is, but this article uses PVE's native commands to import the disk, so you'll need to extract the .img on the host first.
Create the virtual machine
Name and operating system
Click "Create VM" in the top-right corner of PVE.
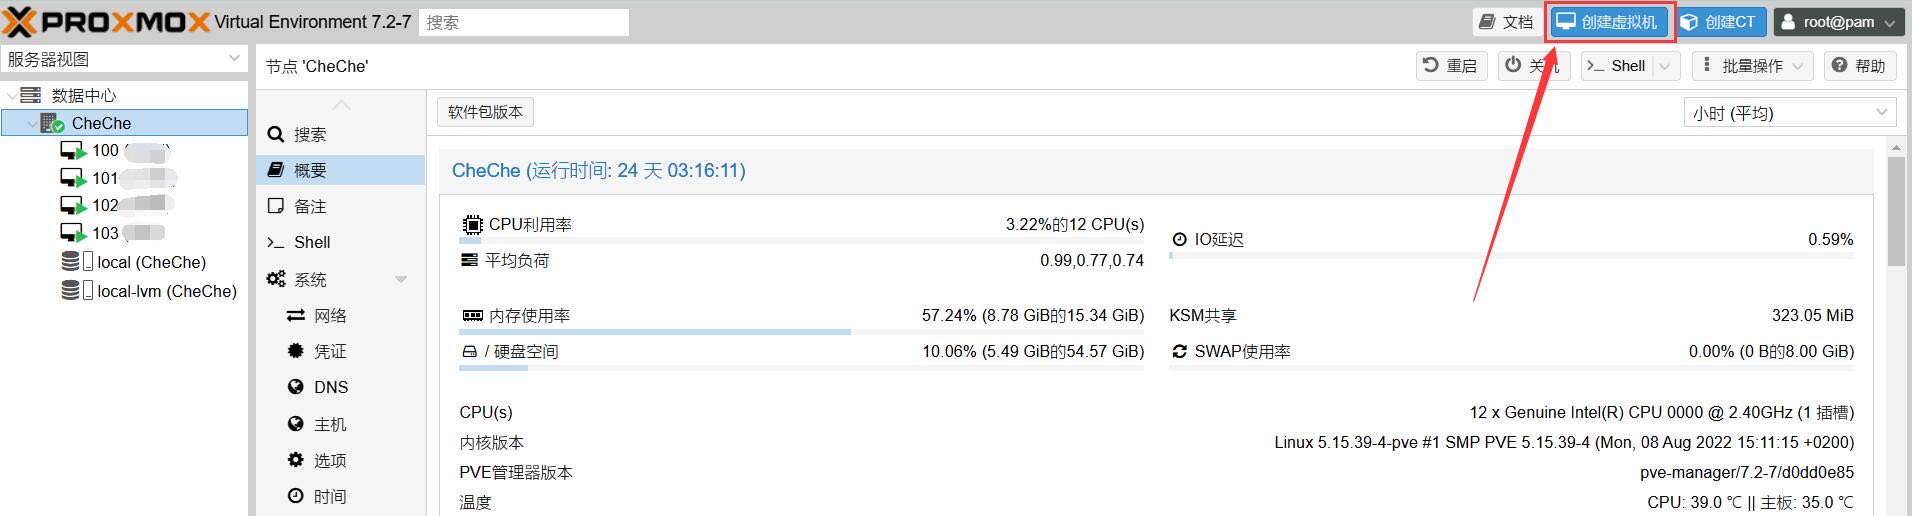
Old screenshot: PVE Create VM entry point
Select the node, note the VM ID, and you can name it iStoreOS. The 104 in the screenshot is just an example; don't overwrite an existing VM.

Old screenshot: VM ID and name
On the OS page, select "Do not use any media" and choose Linux as the guest type. We're not installing from an ISO here; the disk image will be imported directly later.

Old screenshot: Do not use any media
UEFI and the EFI disk
For the UEFI image in this article, choose OVMF (UEFI), add an EFI disk, and select an available VM storage. Per iStoreOS's PVE installation guide, uncheck "Pre-Enroll keys".
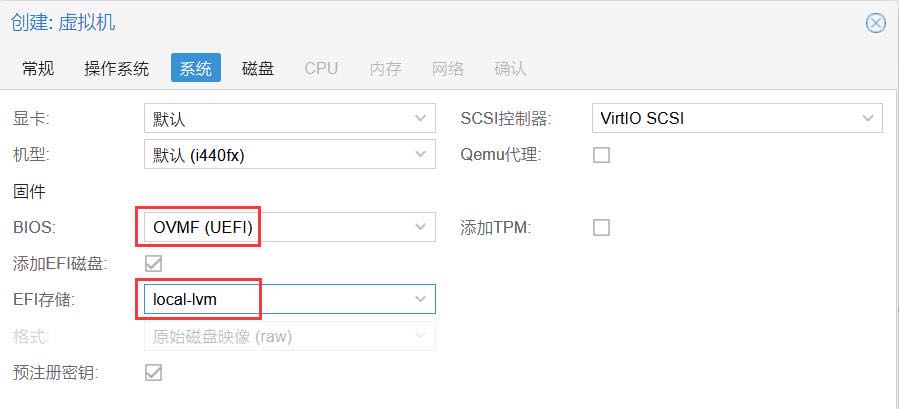
Old screenshot: OVMF and EFI storage, with Pre-Enroll keys checked — do not copy this
Note: the "Pre-Enroll keys" box is checked in the old screenshot — don't copy that. We uncheck it here to configure this VM according to iStoreOS's installation requirements; it is not a request to disable security settings on the host or other VMs.
The EFI disk and the iStoreOS system disk are two different things. The EFI disk stores UEFI variables and similar settings; the system disk is what contains the router OS. For UEFI installs, keep the EFI disk — don't delete it thinking it's the system disk. For PVE's explanation of what the EFI disk is for, see the VM management manual.
If you're using a legacy BIOS image, choose SeaBIOS instead, and you don't need to add an EFI disk:

Old screenshot: SeaBIOS option for legacy BIOS
Disk, CPU, and memory
Remove the plain blank disk from the creation wizard first. What you'll import later is an image that already has the system on it, so there's no need to create a separate blank disk for installation.
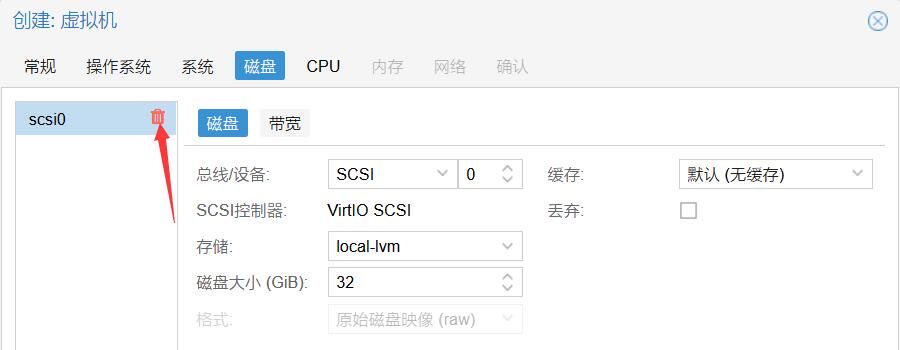
Old screenshot: Removing the blank disk from the wizard
You can start with 2 virtual cores and 2 GiB of memory, then adjust based on actual load. This is the starting configuration for this article — not an official minimum requirement, and not a performance guarantee. If the host runs other services, don't hand all your cores and memory to the router OS right away.
For standalone use, consider CPU type host; if you need to migrate across nodes with different CPUs, pick a CPU type that matches your cluster's compatibility policy first. The old screenshot below allocates 6 cores — no need to copy that.

Old screenshot: CPU type and core allocation
Connect one LAN NIC first
Select the bridge connected to your existing LAN and choose VirtIO as the model. This article assumes the LAN bridge is called vmbr0; check the PVE node's network page first — don't assume it's the LAN just because of the name.

Old screenshot: LAN bridge and VirtIO NIC
Think of a bridge as a software switch inside the host: which bridge a virtual NIC connects to determines which network it joins. For more on this relationship, see the PVE network configuration docs. If your existing network uses VLANs or firewall rules, check those settings too — don't leave everything at defaults.
Before the first boot, open the advanced options for this virtual NIC and check "Disconnect". If you can't find it in the creation wizard, set it after creation under the VM's "Hardware → Network Device → Edit". The old screenshot doesn't show this advanced option; don't skip it because of that. The PVE console doesn't depend on the VM's NIC being connected, so you can still get into the system to change settings while it's disconnected.
Confirm the configuration, and once creation is done, leave the VM powered off for now.

Old screenshot: New VM left powered off
Import the system disk
This article uses PVE's built-in qm disk import so you can verify the import process and target storage. img2kvm is another import method — don't run both workflows on the same VM.
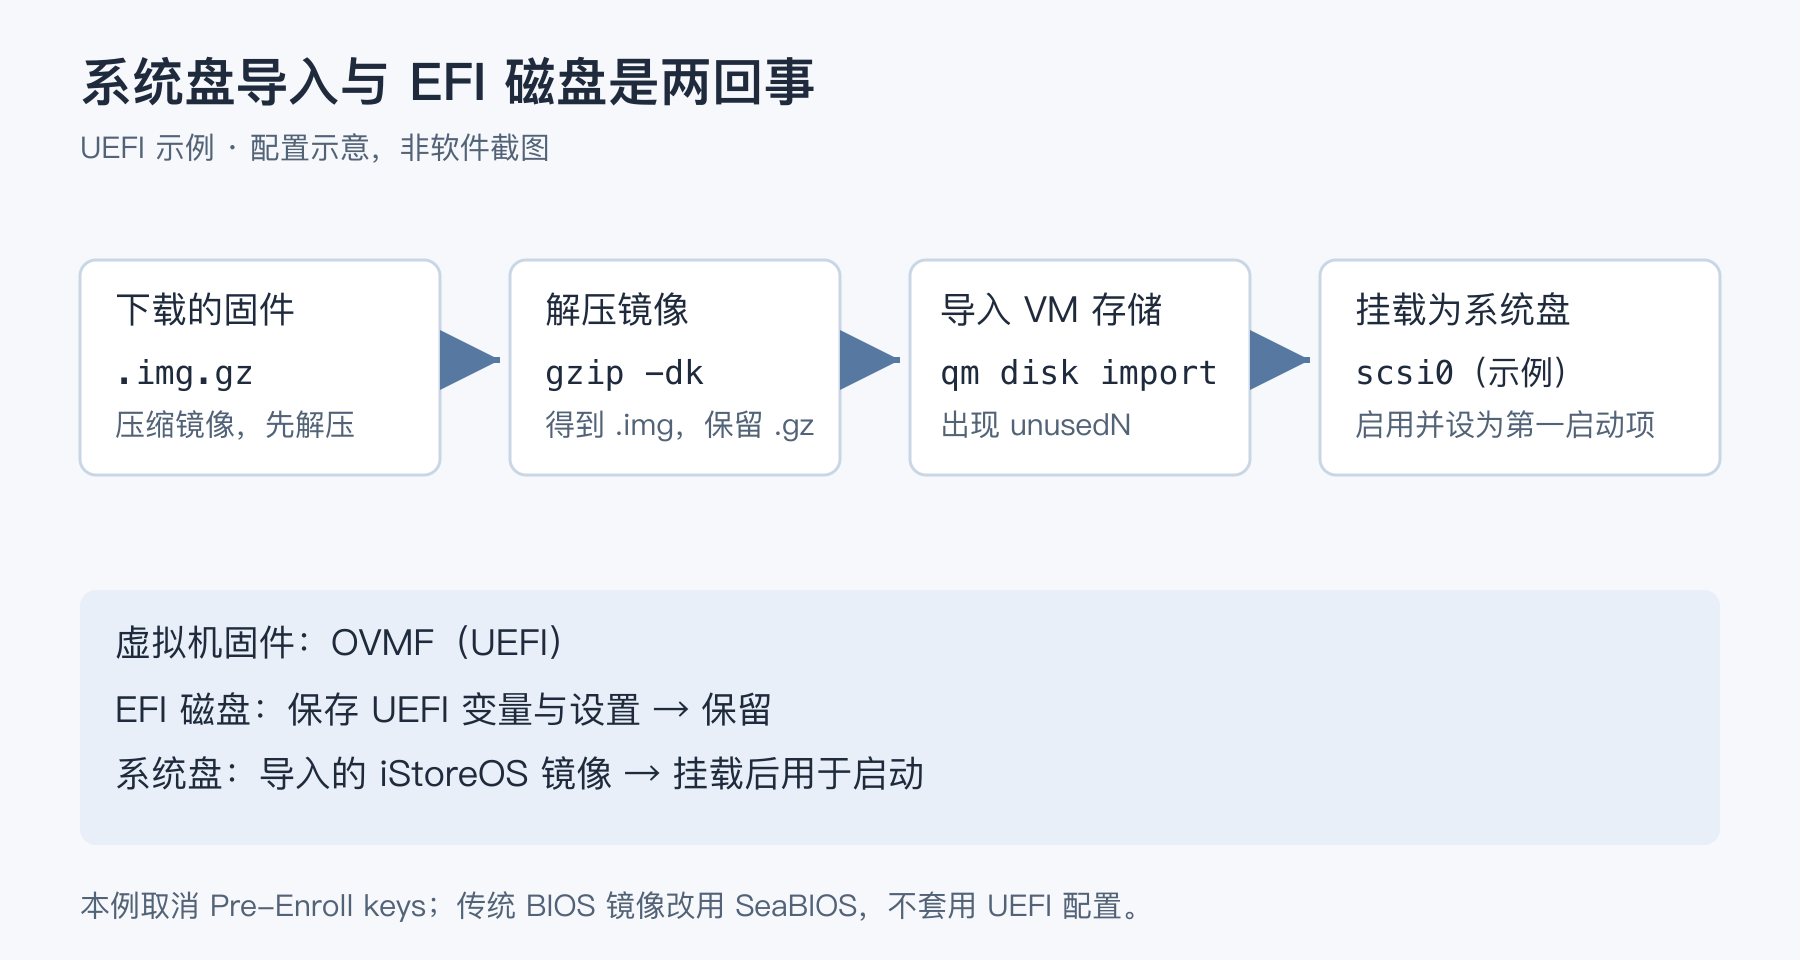
Configuration illustration: extract, import, attach the system disk, and keep the EFI disk
Verify the ID and storage first
Get into the host via the PVE node's Shell or SSH, and confirm the target VM and storage:
qm list
pvesm status
The import command below will add a new disk to VM 104's local-lvm storage. Before running it, confirm that VM 104 is the one you just created, that it's currently powered off, and that local-lvm is available, supports VM disks, and has enough space. If your storage has a different name, replace the last argument of the command.
Upload, verify, and extract the image
Upload the downloaded .img.gz file to /root on the PVE host, using WinSCP or whatever file transfer tool you're comfortable with. This is the host, not inside the iStoreOS VM.
cd /root
gzip -t ./istoreos-25.12.5-2026092410-x86-64-squashfs-combined-efi.img.gz
gzip -dk ./istoreos-25.12.5-2026092410-x86-64-squashfs-combined-efi.img.gz
Only continue if gzip -t reports no errors; -k keeps the archive. This check only verifies that the compressed data is intact — it's no substitute for verifying the source. If extraction says a .img with the same name already exists, check the existing file first; don't force-overwrite just to keep going.
Import to VM storage
qm disk import 104 ./istoreos-25.12.5-2026092410-x86-64-squashfs-combined-efi.img local-lvm
qm config 104
PVE imports the image as an "unused disk" on the VM. In qm config 104 you should see a corresponding unusedN entry, where N isn't necessarily 0. qm importdisk is an alias for this command; for the arguments, see the PVE qm manual.
If the import fails, stop there and read the error: check the image path, the target storage's status, and available space first. Don't keep operating on existing disks after an error, and definitely don't write to the host's physical disk.
Attach the disk and set the boot order
Go back to VM 104's "Hardware" tab and find the "Unused Disk" you just imported — double-click to add it.

Old screenshot: Finding the unused disk
This article uses the SCSI bus with the VirtIO SCSI controller. The disk volume name shown in the old screenshot doesn't have to match; just make sure you're selecting the image you just imported.

Old screenshot: Adding the system disk on the SCSI bus
After adding it, a regular hard disk appears, such as scsi0; a UEFI setup should also still have the EFI disk.
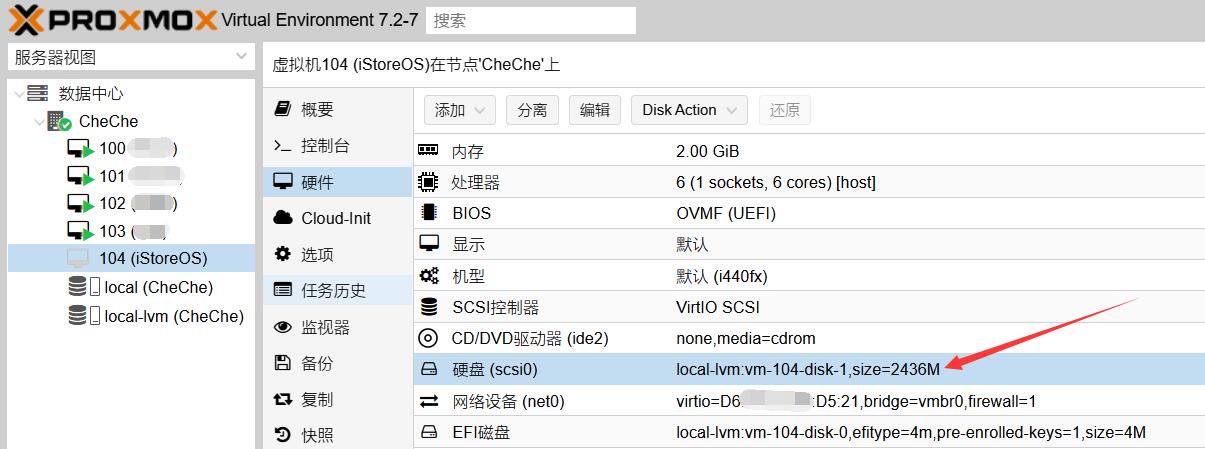
Old screenshot: System disk and EFI disk coexisting
Open "Options → Boot Order".

Old screenshot: Boot Order entry point
Enable it and put the system disk first. The screenshot below uses scsi0; if you attached it on a different bus, go by the actual device name.
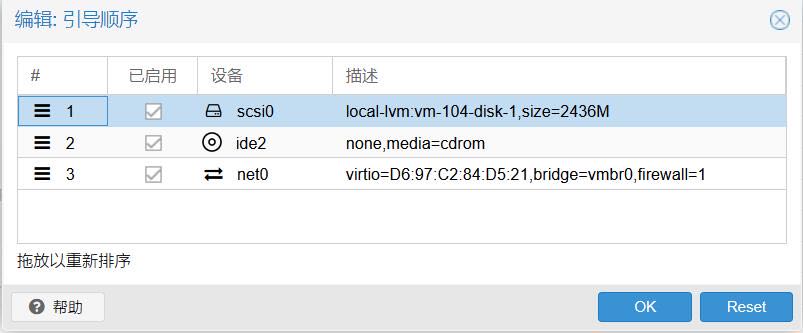
Old screenshot: System disk first in boot order
After saving, double-check the order. If you don't need network boot, there's no need to keep net0 as a boot entry.
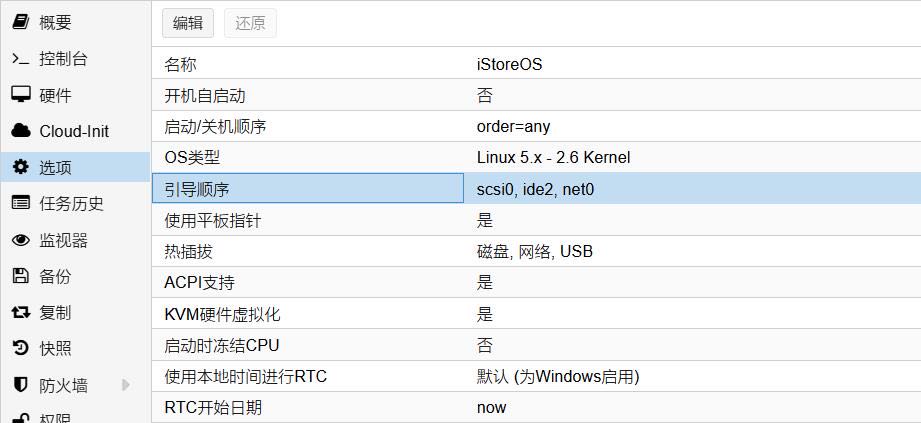
Old screenshot: Boot order after saving
At this point the hardware should have all of: the correct BIOS, the attached system disk, and the LAN NIC temporarily disconnected; a UEFI setup also includes the EFI disk. Once confirmed, start the VM.

Old screenshot: Start VM entry point
First boot and the management address
Open the VM console and wait for the system to boot. Don't take PVE's "started successfully" task status as proof the system is fully usable — check whether the console has reached iStoreOS.
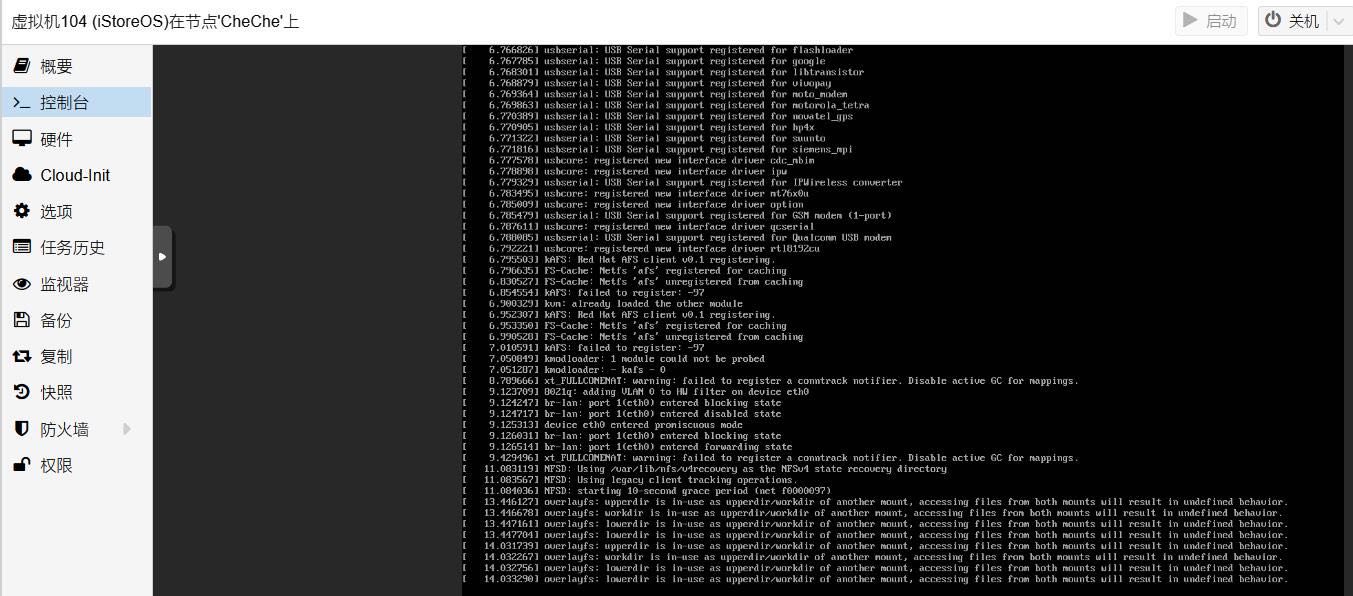
Old screenshot: iStoreOS console boot process
Once you're at the command line, run:
quickstart
Choose Change LAN IP. In the screenshot, the entry for changing the LAN address is 1; other versions may reorder these, so pick by name, not by guessing the number.

Old screenshot: Change LAN IP in quickstart
For the bypass router example, set the LAN address to 192.168.2.2 and the subnet mask to 255.255.255.0. First confirm no device is using this address and that it's not in the DHCP pool that gets handed out automatically.
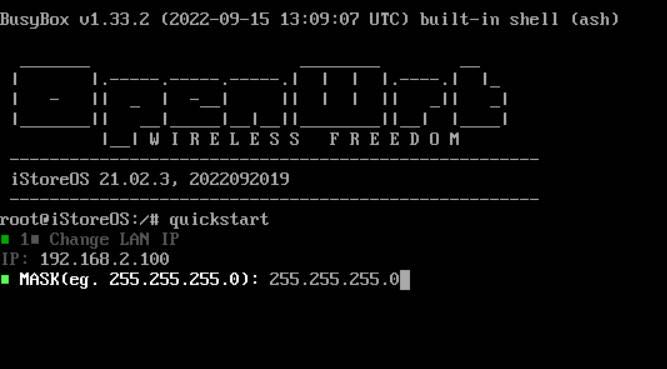
Old screenshot: Entering the LAN address and subnet mask
The old screenshot uses 192.168.2.100, which isn't a required address. The input page above just shows where the operation is; enter the address and mask you planned.
After saving, exit the menu, and don't connect the virtual NIC yet.

Old screenshot: Saving the LAN address and exiting
Disable the temporary address services before joining the existing LAN
If the new system hands out DHCP addresses to your existing LAN or advertises an IPv6 default route, other devices might start routing through it. That's why we disconnected the virtual NIC earlier — to deal with this before connecting.
Run the commands below in the iStoreOS VM's console, not in the PVE host's Shell. First check the configuration:
uci show dhcp.lan
Confirm you see dhcp.lan=dhcp and that this section's interface is lan, then apply the settings below. They only disable address assignment and related IPv6 advertisements on the new VM's LAN — they don't disable the main router's DHCP, and they don't stop the entire DNS service. For these options, see OpenWrt's odhcpd documentation and the dnsmasq init script.
If you can't find this configuration section, or the interface name doesn't match, don't apply the commands and don't connect to your existing LAN; use an isolated test network to reach the management page and verify the actual configuration instead.
uci set dhcp.lan.ignore='1'
uci set dhcp.lan.dhcpv4='disabled'
uci set dhcp.lan.ra='disabled'
uci set dhcp.lan.dhcpv6='disabled'
uci set dhcp.lan.ndp='disabled'
uci commit dhcp
reboot
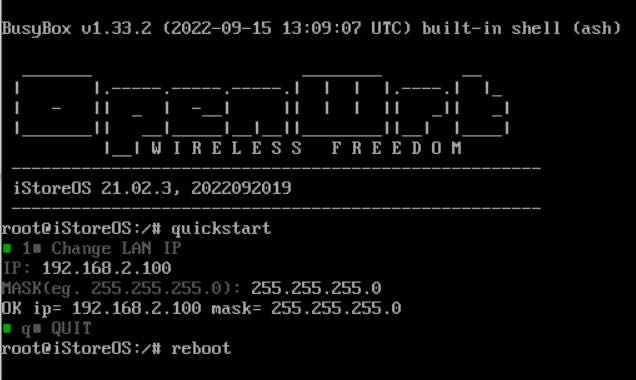
Old screenshot: Rebooting the VM
Wait for the reboot to finish, then go back to the VM's NIC settings in PVE and uncheck "Disconnect". With your computer on the same LAN, open the new address in a browser, e.g. http://192.168.2.2/. If your computer is on a different subnet, check which network it's connected to first — don't blindly change the PVE management address just to reach the page.
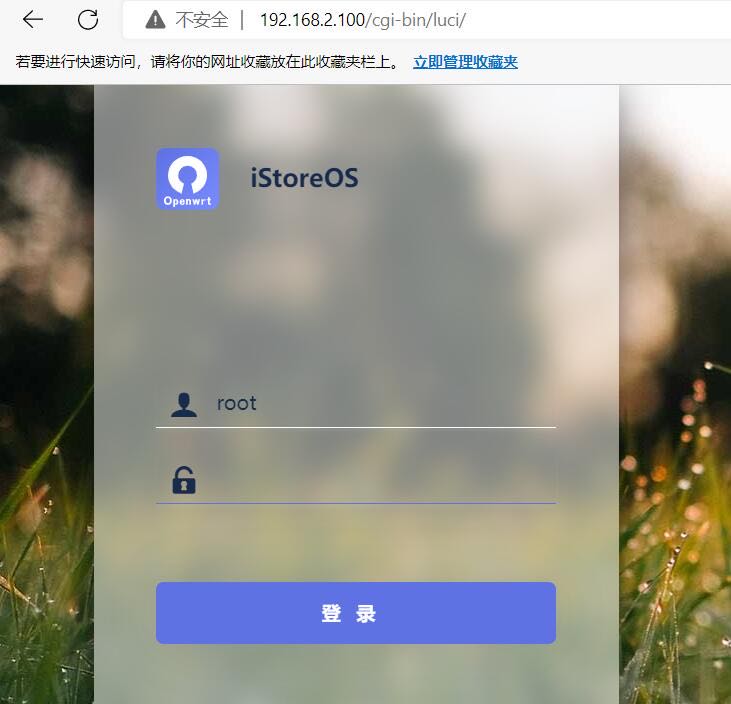
Old screenshot: iStoreOS web login page
The official installation docs list the default login password as password; if your current image prompts you to set a password first, follow what the actual interface shows. Change the default password immediately after logging in, and don't expose the PVE or router management pages directly to the internet.
Joining your existing network
Open iStoreOS's "Network Wizard". Below is the old entry point; the name or layout may have changed in newer versions.

Old screenshot: iStoreOS Network Wizard
For a bypass router, test with just one device first
On a first deployment, keep your existing main router. PVE, iStoreOS, and your computer are all on the same LAN, and iStoreOS reaches the internet through the original main router.

Configuration illustration: Existing main router and iStoreOS bypass router
Following the earlier example, iStoreOS's LAN is 192.168.2.2/24, the upstream gateway is the main router at 192.168.2.1, and DNS should also be set to a working resolver. Complete the "Configure as bypass router" wizard, then verify the result.
Don't let both routers hand out DHCP to the whole LAN. In this example the main router still provides DHCP and iStoreOS's LAN DHCP is off; if you later switch to iStoreOS handing out addresses, disable the main router's DHCP at the same time so they don't fight over it. iStoreOS's FAQ also flags the issues around multiple DHCP servers and bypass router gateway/DNS configuration.
Start by pointing one test computer's IPv4 gateway at 192.168.2.2, and set DNS according to your resolution plan. If iStoreOS provides DNS forwarding, you can use it as the test computer's DNS. Once you've confirmed web pages load, domain names resolve, and the PVE management page is still reachable, then decide whether to adjust the main router's DHCP settings.
Just plugging iStoreOS into a switch won't automatically route all your household devices through it. As long as other devices' gateways still point at the original main router, their default IPv4 outbound traffic still goes straight through the main router. This test also only covers IPv4; if your network has IPv6 enabled, verify IPv6 routing and DNS separately — don't treat the IPv4 result as the result for all traffic.
PVE's management gateway can keep pointing at the original main router initially; there's no need to change it just to "use the bypass router". If something fails, just restore the test computer's gateway and DNS — the rest of the household network is unaffected.
For a main router, keep WAN and LAN separate
If iStoreOS is going to handle PPPoE dialing or connect to an upstream network, it needs separate WAN and LAN. This article covers the dual-NIC, dual-bridge example, not single-cable VLAN trunking.
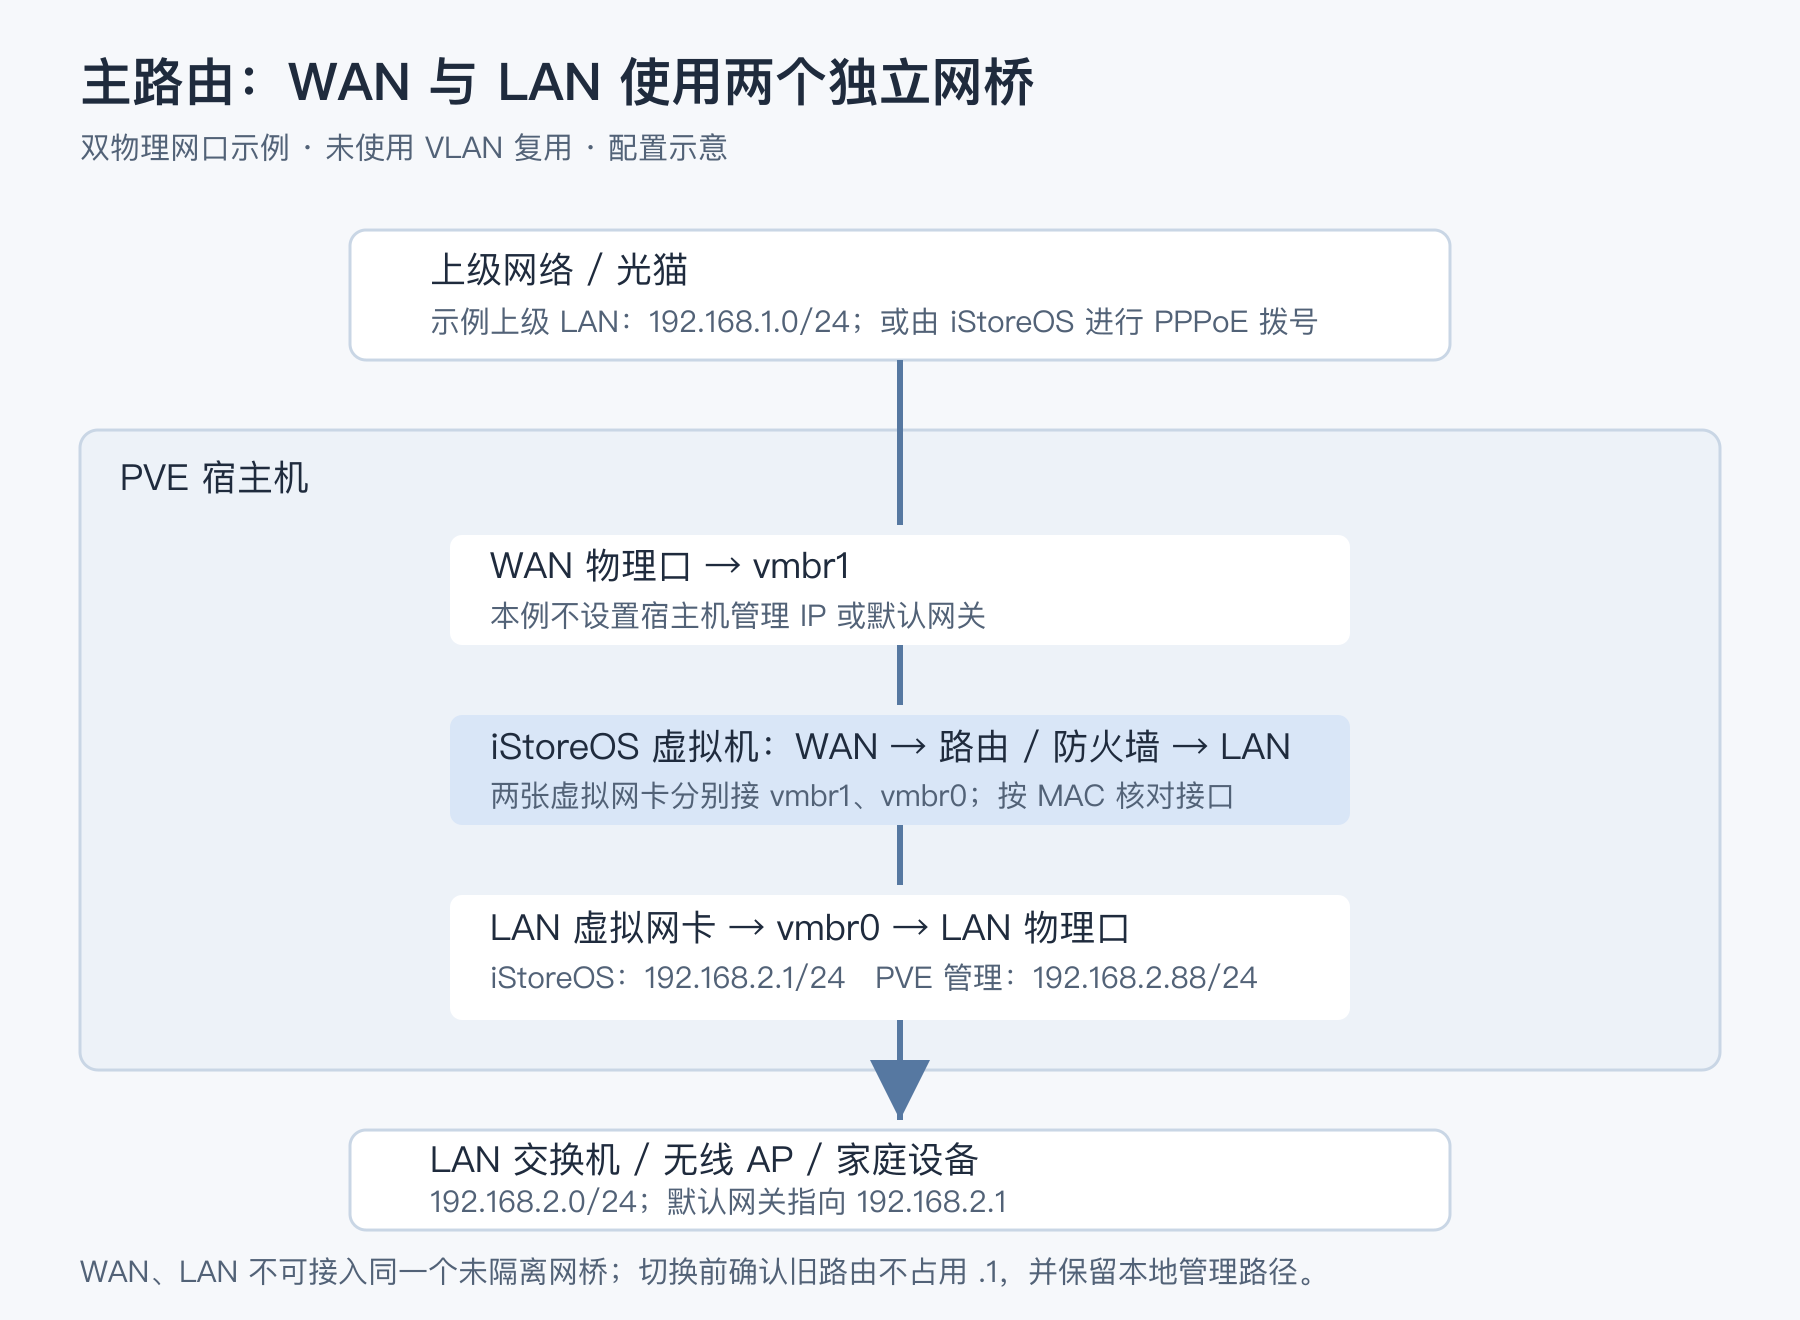
Configuration illustration: WAN and LAN on two separate bridges
In this example:
vmbr0connects to the physical LAN port, PVE's management address is still192.168.2.88/24, and iStoreOS's LAN is192.168.2.1/24.vmbr1connects to another physical NIC facing upstream and carries only WAN; in this example, no PVE management IP or default gateway is set on it.- iStoreOS's two virtual NICs connect to these two bridges respectively, and inside the system you identify which is LAN and which is WAN by MAC address.
These roles depend on the actual wiring and bridge configuration — the names vmbr0 and vmbr1 have no inherent LAN/WAN meaning. Don't connect WAN and LAN to the same unisolated Layer 2 bridge.
After shutting down, add a NIC connected to the WAN bridge under the PVE VM's "Hardware → Add → Network Device".
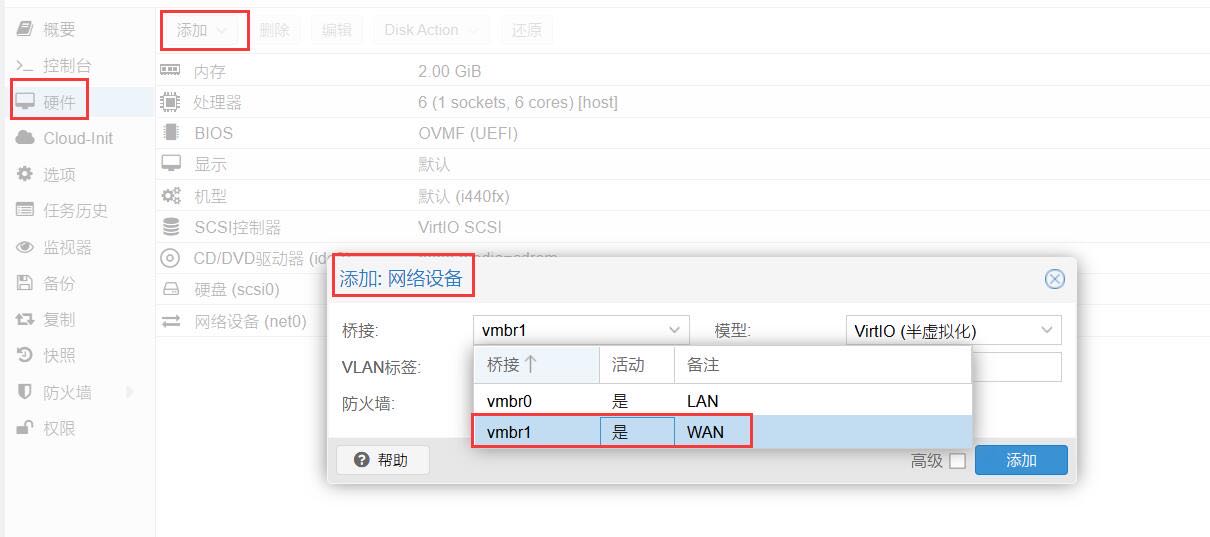
Old screenshot: Adding a virtual NIC connected to the WAN bridge
After booting, configure PPPoE, DHCP, or a static WAN as appropriate. WAN and LAN use different subnets; the illustration's upstream network is 192.168.1.0/24 and the LAN is 192.168.2.0/24, but adjust the actual addresses to your own network.
If the old main router on the same LAN is repurposed as a wireless AP, it should stop handing out its own routing configuration and DHCP. Confirm iStoreOS can reach the internet properly before scheduling the switch, so two devices don't end up claiming the same 192.168.2.1.
We disabled iStoreOS's LAN address services on first boot. Once you actually switch it to be the main router, confirm the old DHCP is stopped and the LAN wiring is correct, then enable the LAN DHCP service in the iStoreOS management interface and set the address pool. Otherwise, clients won't automatically get addresses just because you swapped the main router. Whether to enable IPv6 and how to hand it out needs to be configured separately based on your upstream network — the IPv4 example in this article doesn't cover that part.
Once the main router is ready, if PVE needs to reach the internet through it, that's when you point the default gateway at its LAN address 192.168.2.1. This makes the host's internet connection depend on this router VM, so verify before adjusting, and keep a local management path available.
iStoreOS's IP doesn't need to be lower than PVE's IP. What determines connectivity is the subnet, gateway, routing, and actual connections — not the size of the last octet. 192.168.2.1 and 192.168.2.88 are a common layout, not a rule about numerical ordering.
When something goes wrong, check layer by layer
| Symptom | What to check first |
|---|---|
| Stuck at the UEFI Shell or "no boot device" | Whether the image matches the BIOS; whether the system disk is attached; whether it's enabled and first in the boot order |
| Secure Boot verification failure | Check this VM's Pre-Enroll keys and Secure Boot settings; don't disable security protections for the whole host |
| System boots but the management page won't open | Use the console to verify the LAN address, mask, and NIC; whether the computer is on the correct LAN; whether the bridge, VLAN, or firewall is blocking access; whether the address conflicts |
| Management page works but no internet | Check iStoreOS's own gateway, WAN status, and DNS first, then check the test computer's gateway and DNS |
| Devices sometimes have internet, sometimes don't | Check for address conflicts and whether two uncoordinated DHCP servers are handing out addresses on the same LAN |
| PVE unreachable after switching to main router mode | Check the management bridge and default gateway from the local console first; don't repeatedly try changing the bridge remotely, and definitely don't delete VMs hoping that fixes it |
If the bypass router test fails, restore the test computer's gateway and DNS first. If the main router switch fails, restore the original main router and wiring first; once the system is usable again, check the VM and the network separately — don't mix the two problems together.
After it's set up
Back up the iStoreOS configuration first, then take a full VM backup in PVE. The EFI disk, system disk, and VM configuration should all be saved together. Whether snapshots are supported depends on your actual storage — don't treat a single snapshot as an independent backup.
If you plan to run Docker or heavy download tasks, plan a separate data disk first; don't pile data directly into the system root partition. Plugin updates aren't the same as system upgrades either — don't casually run a full package upgrade. For specifics, see the iStoreOS FAQ.
Once boot, the management page, and networking are all confirmed working, then consider autostart on boot and the startup order of other services. This step deserves extra attention when the main router VM carries your whole household's network.
References and scope
The installation process follows the iStoreOS PVE installation docs.
This article covers the EFI disk, menu choices, and IP address relationships, along with native command imports, storage verification, first-boot isolation, network illustrations, and recovery paths. The old version numbers, addresses, and volume names in the screenshots don't represent this tutorial's configuration values. This article is based on official documentation and configuration notes; the full deployment process was not tested on a real PVE host.
For further reading, see the PVE VM management manual, the PVE network configuration docs, and the iStoreOS FAQ.